This tutorial is for those who know How to use 16x2 LCD or How to make LED display or How to make Propeller display.
By using this you will also learn How to print Custom Characters in LCD like printing HINDI characters or any other language. WOW!!!
So you are using the sample code :P till now, Its time for you to make your own Excel code.
Its more easy and gives you much more feeling about how things are working.
This tutorial covers generating code for
1. Normal LED Array
2. 16x2 LCD
3. LED diaplay
4. Propeller Display or Spin LED
1. A computer having MS Excel or any other SpreadSheet Software like LibreOffice.
2. An AVR board. (You can buy one online from sites like www.robokits.com)
you can download the files from here, LED display.c LCD display.c Propeller.c
You should have some basic knowledge of EXCEL like cells, functions and some formulas, Conditional Formatting,decimal numbers, binary numbers, etc
Open Excel. The method/trick that we'll use to color the cells of EXCEL is called "Conditional Formatting".
By using this you can specify the conditions according to which EXCEL would color the cells automatically.
For e.g. if any cell is having number > 5 then that cell color would become green.
In MS EXCEL 2007 and MS EXCEL 2010 this option is shown below.
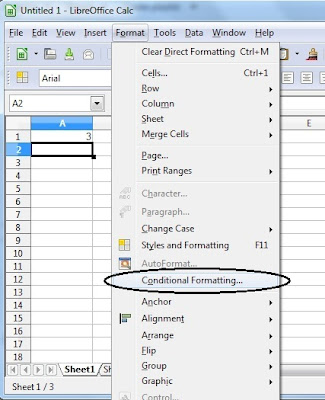
For LibreOffice the option is shown below.
And for MS EXCEL 2003 the option is shown below.
I'll be using EXCEL 2010.

Now click "Conditional Formatting" -> Highlight Cells Rules -> Equal To...

Now type '1' as shown in the box.
Because I want that whenever there is number '1' in any cell it should become 'green' colored, so choose 'Custom Format...'

choose any color like green or red etc and click ok. Click ok one more time.

Note that in every cell wherever there is number 1 its color has been changed to green, rest cells are unchanged.

Since we are generating a code for LCD or LED which are square in shape so lets change the column width of cells.

Set it to 3 or 3.5

See now its looking like a real character which can be displayed on a LCD or LED display.
But still to resemble the background color to that of a DOT PCB you may wish to change the background color.
If you don't know about basics of a Micro Controller then please read this Basics Of Micro Controller.
So now you know that there are 8 pins in a PORT of MCU,.
When the 8 pins are connected to 8 LEDs then to glow
LED1 you have to write PORTB=1; //Assuming that you are using ATMEGA8 or 16 MCU
For LED2 => PORTB=2;
To glow 1st and 2nd LED PORTB=3; to glow all LEDs PORTB=255 and so on......
As an example you can see the below image

Now you can create any Alphabet or a Custom Chartacter, but how are the numbers coming automatically???
Here's the trick
- Select the 'cell' in which the code has to come (here B9)
- Select the 'Formula Bar' and enter the formula =B1+B2*2+B3*4+B4*8+B5*16+B6*32+B7*64+B8*128
- Press ENTER.
You'll see a '0' in that cell, as I have not entered any number in any cell of second column.

Now repeat the step for all other columns!!!
Just kidding :) you don't have to that, just drag the 'small sqaure' to P9, the formula will be automatically changed according to the columns.

You may wish that there should be a way that a comma (,) can be added automatically, so that we can directly paste it in any .c file directly without editing.
Here is the trick....
Add &"," at the end of the formula. Easy enough..... :)
Now the code is generated along with commas in between.
THANKS FOR VIEWING THIS TUTORIAL
Post a Comment


No comments:
Post a Comment